Chapter 1 · Part 1: Foundations
What FPV Actually Is
The whole of chapter 1, free. It is the chapter that decides whether this book is for you: what the hobby actually feels like, what the five pieces of gear are, what they cost in 2026, and what you give up against a drone that just works out of the box.
8,026 words · 5 diagrams · about 37 minutes
Editorial status: the chapter text is complete; 1 planned photograph is still in production.
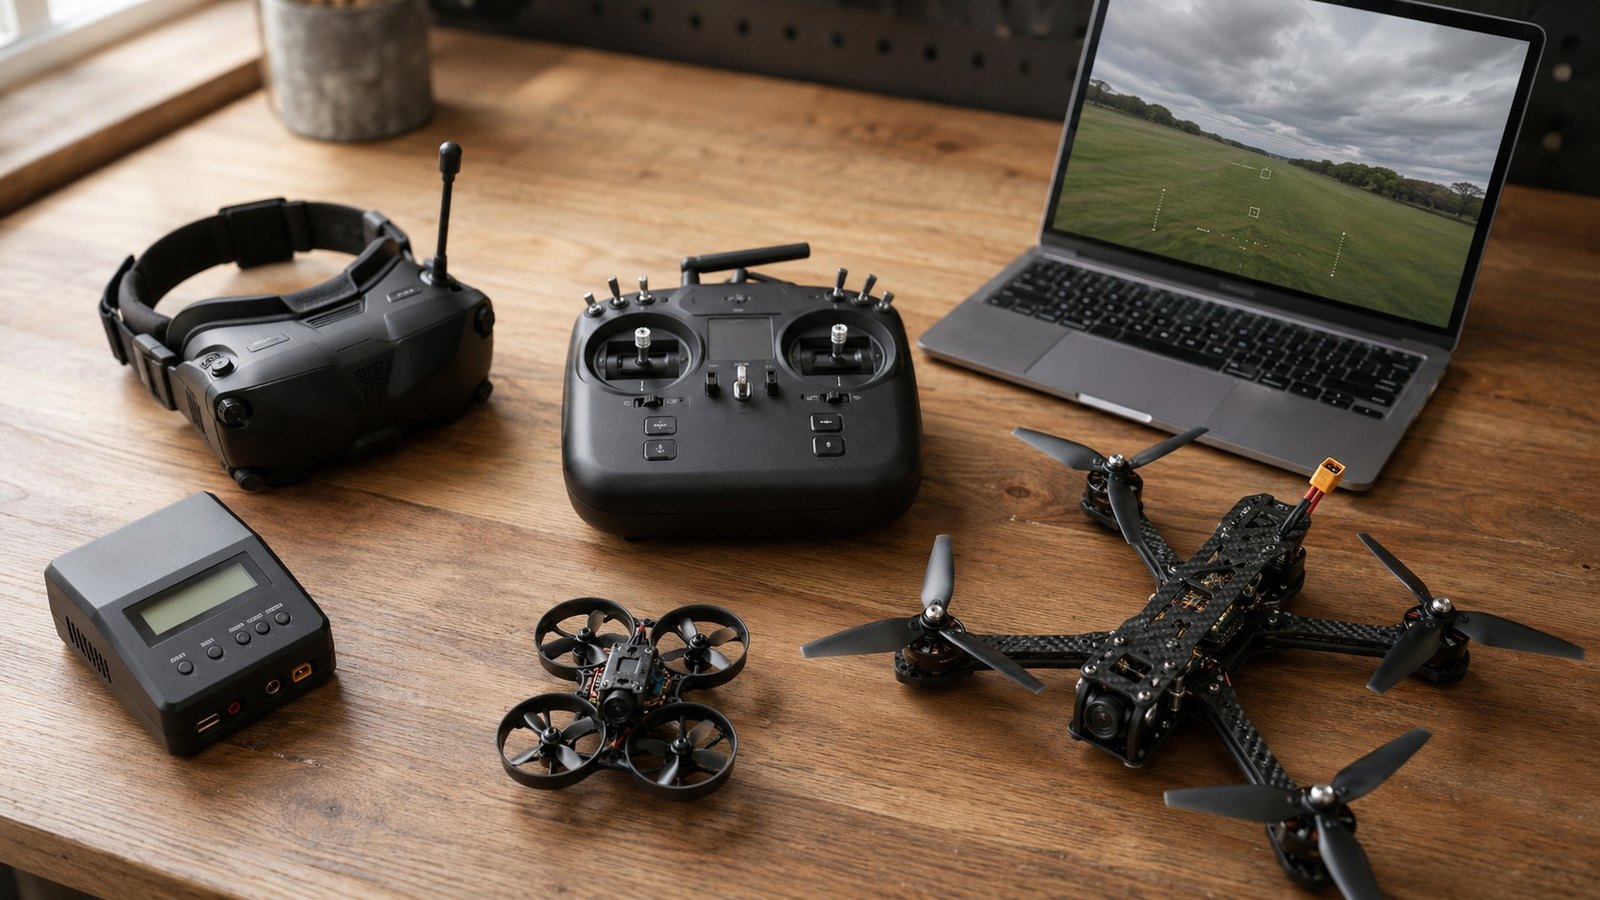 Photo 1.1. Hero bench shot — clean desk layout with goggles, radio, charger, laptop simulator, tinywhoop, and larger quad
The photo above is the workbench you’re about to inhabit: a pair of goggles, a handheld radio, a charger, a laptop running a simulator, one small ducted aircraft, and one larger frame. Six objects, and they all talk to each other. The chapter you are reading exists because the listings on the retailer site you opened last night did not.
The hook: spectacular footage, chaotic listings
You watched a freestyle edit. Maybe it was a quad weaving between trees, maybe a long swooping line across a snow-covered ridge, maybe a tight pass through a rolled-up garage door. You searched “FPV drone.” Then the listings hit: 65 mm whoops, 5-inch frames, 7-inch frames, 4S vs 6S, ELRS vs Crossfire, analog vs HD digital, DJI O3 vs O4 vs Walksnail, BNF and PNP and RTF, and a thousand acronyms with no obvious order to them.
That confusion is normal. The listings are sorted by size and price, not by what kind of flying any of them are good at. Nothing on the shopping page tells you that the aircraft in your favourite freestyle edit and the aircraft in your favourite cinematic edit are different categories with different costs, different repair profiles, and different first-year experiences. Worse, your friend with a DJI Mavic (which you’ve flown) turns out to be almost no help, because what you saw in the edits is not what a Mavic does.
This chapter fixes that. By the end of it, you will have a map. You will know the five pieces of starter gear, the eight common quad categories, where this book’s two builds sit on the map, and roughly what the first year costs at 2026 prices. You will not yet know how to solder, configure Betaflight, or charge a LiPo. Those are later chapters. What you will have is the orientation that lets you choose a path on purpose, instead of accidentally buying the wrong thing twice.
Do not buy parts yet. Finish the chapter first.
Learning Objectives
By the end of this chapter, you will be able to:
- Describe what FPV flying actually feels like, in plain language, and explain why goggles are different from watching footage on a phone.
- Name the five shared starter pieces — radio, quad, goggles, charger, simulator — and explain which four are reused across multiple builds.
- Place the common quad categories on a map by size, weight, cost, and use case.
- Compare FPV with fixed-configuration camera drones such as the DJI Mavic and the DJI Avata, in terms of performance, repairability, polish, and flight time.
- Estimate 2026 cost ranges for shared gear plus the book’s two build paths.
- Find at least three places FPV help lives: clubs, MultiGP chapters, FPV Discords, RDQ Forums.
- Hold off on buying parts until your map and budget worksheet are done.
What FPV actually feels like
FPV (first-person view) is a way of flying where the pilot sees a live video feed from the aircraft, usually through goggles, and controls the quad as if seated inside it. That definition is correct. It is also useless until you’ve worn goggles for the first time.
Photograph not yet shot — ph_01_02.jpg. The prose around it is final.
Photo 1.2. Pilot wearing goggles, quad unpowered in foreground
Watching FPV footage on your phone, even at 4K on a good display, is watching a movie. The frame of the screen is the edge of the world. Your peripheral vision is full of your kitchen. When the pilot rolls the aircraft on its side and threads a gap, you feel the shot, not the lean.
Goggles change the proposition. The screen becomes your visual frame of reference. Modern HD goggles like the DJI Goggles 3 use a 0.49-inch micro-display in front of each eye at 1920×1080 with up to a 100 Hz refresh rate.1 There is no kitchen anymore. There is a camera mounted on the front of an aircraft, and that camera is now your face.
The first thirty seconds tend to go like this. The pilot hands you the goggles. You put them on. You see a live feed from a quad sitting ten metres away on the grass. It looks normal: a static, slightly fish-eye view of a field. Then they arm the quad and bring it up to a low hover. Your stomach lurches a little, even though your body has not moved. Your brain is using the video as ground truth and is now confused about why your inner ear says you’re sitting in a folding chair.
Here is the part beginners always get wrong: head movement does not steer the aircraft. If you turn your head to look at something interesting in the feed, the camera does not follow you. The quad keeps flying wherever it was pointed. Some HD systems do support a head-tracking mode for fixed-mount cameras, but on a standard freestyle quad the camera is bolted to the frame at a fixed tilt angle. The view rotates only when the aircraft rotates. The aircraft only rotates when the sticks tell it to.
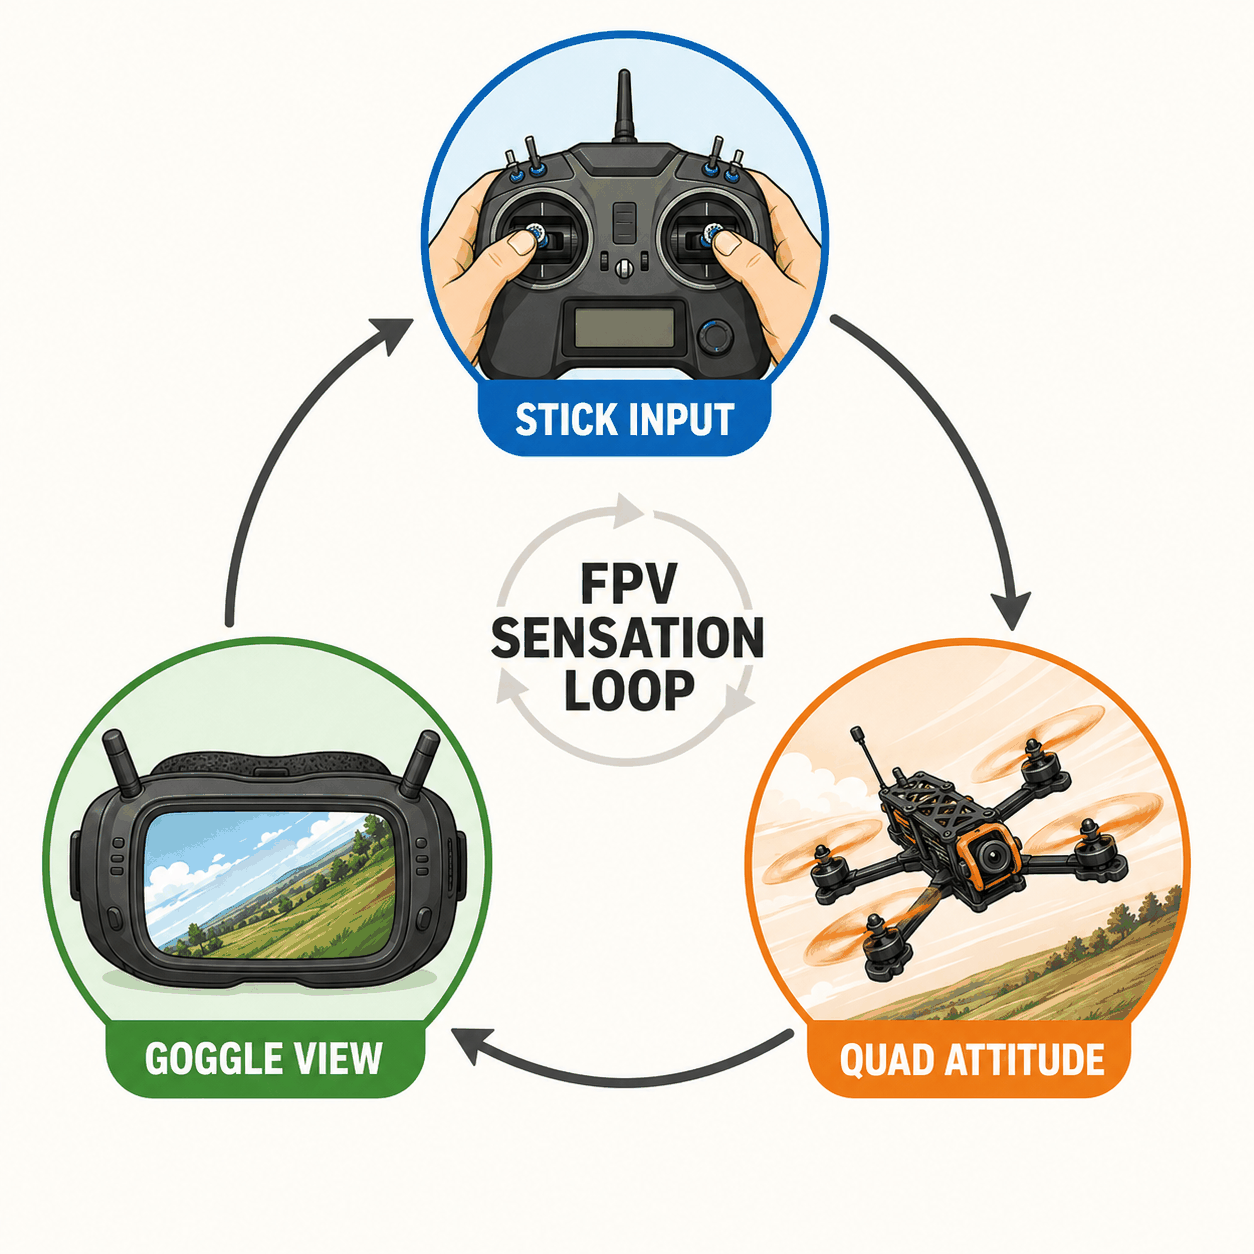 Figure 1.1. The FPV sensation loop
The loop above is the one you are joining. Your sticks command the motors. The quad’s body rotates and translates in response. The camera, bolted to that body, sends a video feed back to your goggles. Your brain trusts the video, decides what it wants to do next, and your hands move the sticks. That loop runs as long as you’re flying. It feels immersive because the only feedback channel you have for orientation is the channel you are also commanding through.
This is why a simulator matters. A simulator is desktop software that pairs with your radio over USB and lets you fly a virtual quad with the same sticks you will eventually use on a real one. Liftoff and VelociDrone are the two most common at the time of writing. Hours in a sim are how you teach your hands to do what your eyes are asking, without releasing magic blue smoke from a real aircraft.
The first time most pilots fly a real quad, the sensation of being inside the aircraft is what makes them stay. The first time they crash a real quad, the sensation of having forgotten where the sticks are is what sends them back to the simulator.
WARNING — eye safety and the goggle strap. Goggles change your visual frame of reference. While wearing them, you cannot see your feet, the curb, the dog, or the person walking through the field. Use a spotter who maintains visual line of sight on the aircraft, and check your local rules. Many jurisdictions require a visual observer when the pilot is wearing goggles. Tighten the head strap properly so the goggles do not fall off mid-flight. Treat goggles as serious flight equipment, not a VR toy.
The five-piece starter ecosystem
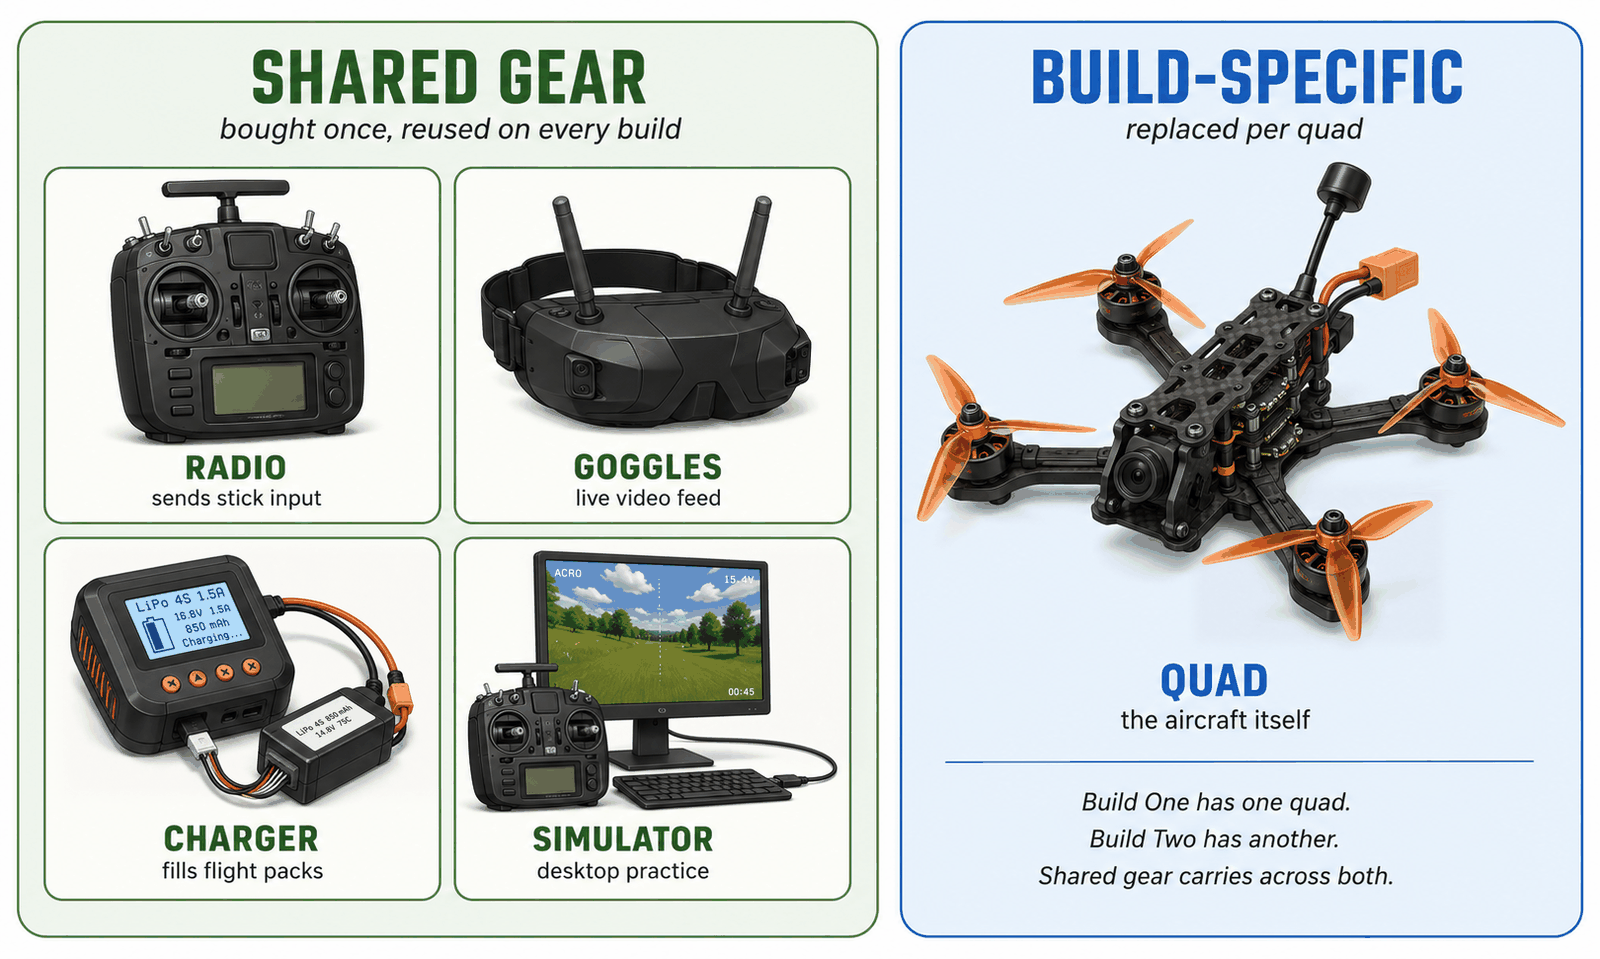 Figure 1.2. The five-piece starter ecosystem
Five pieces. That is the whole starter kit, in concept.
The radio is the handheld transmitter that sends your stick commands to the quad. Common current options include the RadioMaster Boxer and the smaller RadioMaster Pocket, both of which ship in 2.4 GHz ELRS variants and run open-source EdgeTX firmware.2,3 The radio talks to a small receiver (RX) on the aircraft. In this book we use ExpressLRS (ELRS), a current open-source 2.4 GHz control link.4
The quad is the aircraft you build. It is the only build-specific item in the list. Build One has its own quad. Build Two has another. The radio, goggles, charger, and simulator carry across both.
The goggles are the display you wear to view the live video feed from the quad. This book uses goggles, never headset. A headset is audio. There are two broad goggle ecosystems in 2026: HD digital systems (DJI O3/O4, Walksnail Avatar, HDZero) and analog. The DJI Goggles 3 and Walksnail Avatar HD Goggles X are representative of the current HD options.1,5
The charger is the bench device that fills your flight packs. Common modern beginner chargers include the ISDT 608AC and the SkyRC B6neo Smart Charger, which handle the LiPo chemistry your packs use.6,7 “Charger” here means a hobby-grade charger that provides the correct chemistry, cell-count, current, and balance controls. Depending on the model, it may plug into the wall directly or need a compatible DC or USB-C PD input supply and the correct charge leads.
The simulator is desktop software you use to practice with your radio before risking a real aircraft. Liftoff and VelociDrone are both commonly recommended. The radio plugs in over USB and acts as a game controller.
That is the ecosystem. There is no sixth essential item. Everything else — props, batteries, video transmitters, action cameras, frames, motors, electronic speed controllers (ESCs), flight controllers — lives inside the quad category and is build-specific.
Why four of those five pieces are reused
Beginners often imagine that “buying an FPV drone” means buying one bundled package, the way buying a Mavic does. It does not. The radio, goggles, charger, and simulator are bought once and reused across every quad you fly afterwards, as long as you stay inside compatible ecosystems.
Concretely: the same RadioMaster Boxer with an ELRS internal module will bind to the ELRS receiver in your tinywhoop, and to the ELRS receiver in your 5-inch freestyle quad, and to the ELRS receiver in a future 7-inch long-range build.8 You buy it once. The same DJI Goggles 3 will receive video from a DJI O4 Air Unit on a tinywhoop and from a higher-end member of the DJI O4 Air Unit Series on a 5-inch.9 The same charger fills 1S whoop packs and 6S freestyle packs, as long as the charger supports both cell counts. (Brief read-ahead: S is the number of LiPo cells wired in series — 1S is one cell at about 3.7 V nominal; 6S is six cells at about 22.2 V. Chapter 4 teaches the voltage math in full.) The same simulator practices with the same radio.
The quad itself is the disposable layer. Frames break in crashes, components get swapped during upgrades, motors burn out, video systems get replaced when a better one comes along. The quad changes. The four pieces around it stay.
This is why the book treats shared gear as the first investment, not as part of any individual build. You spend that money once. Build One’s tinywhoop sits on top of it. Build Two’s 5-inch freestyle quad or sub-250 g toothpick sits on top of it. Future quads, if you keep flying, sit on top of it.
The compatibility caveat: ecosystems matter. An ELRS radio talks to ELRS receivers, not to the older Crossfire or FrSky links.4 DJI goggles talk to DJI air units; Walksnail goggles talk to Walksnail air units; HDZero goggles talk to HDZero VTXs.1,5 Pick a control-link family and a video-system family early and stick with them. Chapter 3 covers this in detail. For now, the takeaway is: choose carefully once, save twice.
Rough 2026 starter price bands
Numbers next. These are bands, not quotes. Currencies, retailers, and stock fluctuate, and any single quote will be stale in three months.
A complete shared-gear set, in 2026, falls into roughly these tiers:
- Budget shared gear (analog-aware path): about $400–$550 USD. A radio in the Pocket or Boxer class (~$70–$155), an analog goggle setup (~$150–$250), a charger — the ISDT 608AC runs from a wall socket, the SkyRC B6neo is DC-input and needs a USB-C PD supply (~$80–$100), and a simulator licence (~$20–$40).
- HD digital shared gear: about $700–$1,200 USD. The radio and charger are the same; the goggles jump to HD (Walksnail Avatar HD Goggles X starts around $459 USD; DJI Goggles 3 sit higher), and you commit to a video-system family for both builds.
Goggles drive the cost. The radio is mostly a fixed line item: a Pocket-class radio runs around $70 USD and a Boxer-class radio around $155 USD as of 2026 retailer listings.2,3 The simulator and the charger are also fixed and modest. Goggles are where you decide your standard of living for the next two years.
Build-specific costs sit on top of shared gear. A current analog bind-and-fly tinywhoop in the Air65 class lists around $80 USD.10 That is the integrated route if you want to skip the bill of materials (BOM). The from-parts HD whoop carts that chapter 6 walks through are roughly $280–$340 delivered because every line item is purchased separately and the video-system choice changes the total. A 5-inch freestyle build, parts only, typically lands somewhere between $300 and $700 depending on whether it is analog or HD digital. A sub-250 g toothpick path is similar but trades repairability for weight.
We will revisit these in detail later in the chapter. The rough takeaway: budget at least $700 for a complete first-year analog setup, and about $1,500–$2,500 for an HD setup, parts, shared gear, and first-year replacements combined. Analog can be the right budget path. If you expect to move to HD later, price that as a second ecosystem decision: goggles and aircraft video hardware may not carry over, so the cheaper first checkout is not automatically the cheaper two-year path.
The quad category map
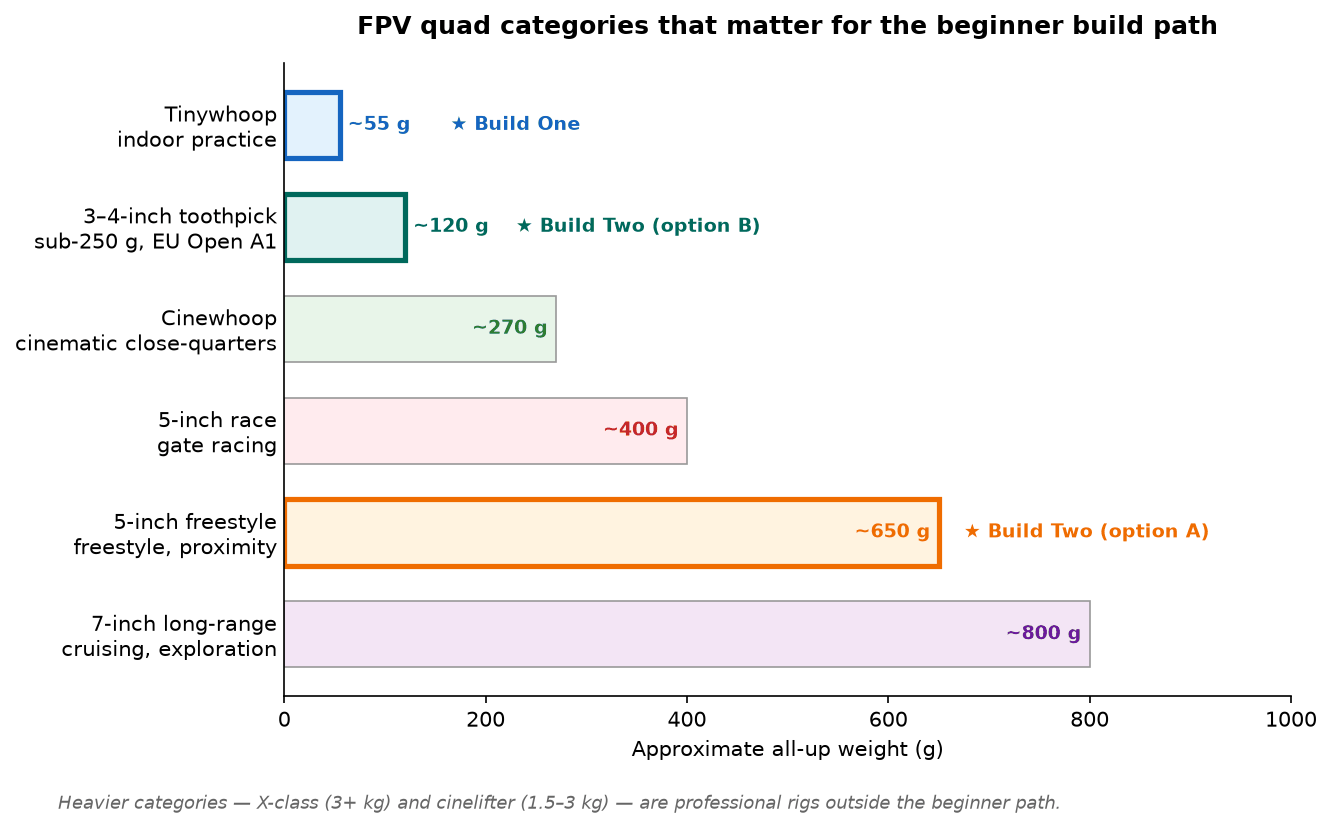 Figure 1.3. FPV quad category map
The map above sorts the categories by approximate weight, lightest at the top. Read those figures as class markers, not as build specs. A finished aircraft lands heavier than its category number once the pack, the HD gear, and any action camera are on board. The book’s current listed-parts ledgers put the light and performance 4-inch toothpick variants at about 186 g and 235 g respectively. The 5-inch freestyle build is about 626 g with its 1400 mAh pack and no action camera, or about 790 g with the specified HERO and mount. Build One’s current carts are about 29 g for the analog 65 mm path, 44 g for HDZero on the 75 mm path, 49 g for the equivalent Walksnail substitution, and 47 g for the DJI 80 mm path before any unlisted screws are measured. Build Two then offers the 5-inch freestyle quad or a sub-250 g 4-inch toothpick. These are planning ledgers, not promises: replace every listed value with the finished scale reading. X-class and cinelifter appear only in the footnote at the bottom of the map and stay outside the beginner path for the rest of the book.
The “sub-250 g, EU Open A1” label on the toothpick row is planning shorthand, not permission to fly. Under EASA’s current rule for a privately built aircraft, A1 requires maximum take-off mass including payload below 250 g and maximum operating speed below 19 m/s, plus every other applicable Open Category and national requirement.11,12 Weight alone does not establish A1 eligibility, does not authorize flight over assemblies of people, and does not erase operator or location obligations. The toothpick remains a first-class Build Two path because those design targets can reduce regulatory friction when the finished aircraft and intended operation satisfy the complete rule set; every chapter from 9 onward therefore treats both Build Two routes in parallel.
A tinywhoop is a small ducted FPV quad designed for durable indoor practice and calm outdoor flying. The book’s current Build One carts span 65–80 mm and about 29–49 g on their listed-parts ledgers. The analog alternate uses an Air65 II-class frame; the default HDZero and Walksnail structure uses a Meteor75 frame with the matched Micro HD canopy, while the DJI path uses an 80 mm O4-compatible frame. Chapter 6 gives the exact cart for each goggles ecosystem. The ducts protect the props, the props protect your furniture, and the low mass means a wall hit is rarely fatal to the aircraft.
A cinewhoop is a larger ducted FPV quad designed for controlled close-proximity cinematic work, usually carrying an action camera or a high-quality onboard camera. Cinewhoops often fly slower than freestyle quads and use ducts that reduce exposed-prop risk, but they can still injure people and damage property. Flights near actors, vehicles, or tight gaps require a trained pilot, a controlled set, informed participants, a rehearsed route, and whatever permission and operating rules apply; ducts are risk reduction, not a safety guarantee.
A 3-inch quad sits between whoops and 5-inch builds — compact enough for tight outdoor spaces, but with open props and enough thrust to handle real outdoor wind. It is not an indoor trainer: use a ducted tinywhoop for indoor practice. The 3-inch is the natural bridge category: more outdoor-capable than a tinywhoop, less punishing in a crash than a 5-inch, and a common platform for “toothpick”-style frames that prioritise weight over durability. Many sub-250 g builds, travel kits, and lower-crash-cost freestyle practice rigs live in this category, which is why the book’s sub-250 g Build Two path leans on it.
A 5-inch freestyle quad is a powerful FPV quad using approximately 5-inch props, commonly used for acrobatics, proximity flying, and the type of freestyle edits that attract many new pilots. This is the canonical “FPV drone” you saw in the freestyle edit. Frame, motors, ESC, FC, video transmitter, camera, receiver, and a 4S or 6S pack (typically 1300 to 1800 mAh). The FC is the flight controller, the board that reads your sticks and decides what each motor should do; the ESC is the electronic speed controller that makes the motors do it.
A 5-inch race quad is a 5-inch FPV quad optimised for speed, gate precision, and racing rather than durability, smooth capture, or beginner repairability. Race quads share the basic 5-inch architecture with freestyle quads but trade structural margin for weight, and trade onboard recording for low latency. They live at MultiGP chapters and race events.13,14
A 7-inch long-range quad is a larger FPV quad intended for efficient cruising and longer-distance flying, with greater regulatory, safety, and recovery responsibilities. Larger props, more efficient motors, larger packs, and often a GPS module. Long-range flying brings additional rule considerations: Remote ID compliance in the United States, range and category rules in the EU.11,15
X-class is a very large high-power racing or demonstration quad category, far outside the beginner build path. Cinelifter? A cinelifter is a large FPV platform built to carry heavier cinema cameras such as a RED or a BMPCC. Both categories are listed here so you recognise them in retailer searches and YouTube edits, not because you should buy one.
This is the category map. It is not a ranking. It is a layout of which quad solves which problem.
Who flies each category, and what each one is for
Categories matter because they translate directly to pilot goals. Buying the wrong category is the most common expensive mistake in beginner FPV.
A pilot who wants to practice indoors at home often chooses a tinywhoop: a cleared living room, garage, hallway, or empty office. Low AUW (all-up weight) and ducts reduce the likely severity of a strike and often reduce damage compared with an open-prop quad, but a tinywhoop can still injure eyes, skin, pets, or bystanders and can mark fragile surfaces. Clear people, animals, breakables, and loose material from the practice space. Tinywhoops are also a lower-energy outdoor choice on a dead-calm morning when you’re still learning to land without crashing.
A pilot who wants to shoot smooth real-estate fly-throughs, music videos, or controlled close-proximity cinema may choose a cinewhoop. Its mass can help it hold a line in light wind, and ducts reduce exposed-prop risk, but neither makes flight between people inherently safe. A trained pilot should use a controlled, rehearsed route with informed participants kept outside the flight path, plus the permissions and operating conditions the location requires. Some cinewhoops carry a GoPro; others carry a member of the DJI O4 Air Unit Series with an integrated 1/1.3-inch sensor and 4K/120 fps recording.9
A pilot who wants outdoor agility without the weight and crash cost of a 5-inch flies a 3-inch or toothpick. This is the natural fit for readers considering the book’s sub-250 g Build Two path, for pilots whose only flying space is a small park or schoolyard, and for anyone whose neighbours, noise constraints, or local rules push them toward a lighter platform. The 3-inch is for park freestyle at moderate intensity, light cinematic cruising on calm days, and skill transfer from the whoop to larger quads. It is not for heavy camera lifting, racing specialisation, or long-range mountain cruising. It does not have the payload, the gate-precision optimisation, or the cruise efficiency for any of those jobs.
A pilot who wants to fly freestyle in the local park — power loops, dives, proximity passes through trees, the kind of flight that fills YouTube edits — flies a 5-inch freestyle quad. The 5-inch class is the centre of gravity of the hobby. Most parts are designed for it. Most tutorials assume it. Most local clubs have at least one regular 5-inch freestyle pilot.
A pilot who wants to race through gates against other pilots flies a 5-inch race quad. Racing has its own ecosystem: leagues like MultiGP, chapter-organised events, formal class rules, and a community of pilots who fly the same tracks repeatedly to shave tenths of a second off their lap times.13,14 Race quads are not the right first build for a generalist beginner. They’re optimised against the things a beginner needs (durability, repairability, smooth capture).
A pilot who wants to cruise mountain ridges, follow vehicles at distance, or shoot wide landscape lines flies a 7-inch long-range quad. These are bigger, heavier, more efficient at cruise, and bring more rule responsibility: Remote ID compliance in the U.S., Open Category sub-class rules in the EU.11,15 A 7-inch is a sensible second-year build, not a first.
A pilot who flies demonstration-scale aircraft at airshows flies X-class. A pilot who lifts a $20,000 cinema camera over a film set flies a cinelifter. Both are professional categories. Both are out of scope for the book.
The lesson under the map: bigger is not better. Bigger is more capable in specific dimensions and more dangerous, more expensive, and harder to learn on. A first-year pilot on a 5-inch freestyle quad is happier than a first-year pilot on a 7-inch long-range build. A comparable crash on the larger aircraft can damage larger, costlier parts and carries more energy into whatever it hits.
Where the book’s two builds sit on the map
The book follows a deliberate two-build progression.
Build One: Tinywhoop. A 65–80 mm ducted brushless whoop matched to the goggles ecosystem selected in chapter 3. The default HDZero cart uses a Meteor75 frame and matched Micro HD canopy; the Walksnail path substitutes its own VTX/camera kit on that structure, the analog alternate uses the Air65 II path, and the DJI cart uses an O4-compatible 80 mm frame. With one carried pack, the current listed-parts ledgers are about 44 g for HDZero, 49 g for Walksnail, 29 g for analog, and 47 g for DJI before unlisted screws or measured corrections. Chapter 8 measures actual pack runtime; do not infer it from a different bind-and-fly model’s marketing figure. Built across chapters 6–8, the whoop is the lower-energy way to learn the build pipeline — parts → assembly → test → tune → fly — before moving to an open-prop aircraft. Ducts and low mass reduce consequences; they do not erase them. Clear people, pets and loose objects from the test area, wear eye protection at the bench, remove props for powered diagnostics unless the procedure explicitly requires them, and inspect the aircraft after every impact.
Build Two: 5-inch freestyle, or sub-250 g toothpick. Built across chapters 9–13. Two paths because two reader populations exist: pilots in regions where the regulatory burden of staying under 250 g is meaningful (much of the EU, parts of North America after Remote ID), and pilots who want the canonical 5-inch freestyle experience. Note that sub-250 g is not automatically legal everywhere. Many jurisdictions still require registration, Remote ID, observer rules, or operating-category compliance regardless of weight, and you must verify your current local rules before flying. The 5-inch path is the spine of the hobby and the platform most tutorials assume. The sub-250 g toothpick path keeps the AUW down and reduces some rule overhead but trades the structural margin and crash-survivability of a 5-inch frame.
This progression — small, then larger — is deliberate. You learn to solder around lower-cost whoop parts before the larger Build Two electronics are at risk. You learn to read failsafe behaviour on a lightweight, ducted aircraft rather than an open-prop 5-inch. You learn to recover from disorientation on a quad you can fly indoors. By the time you do Build Two, the build pipeline is muscle memory and your attention is free for the parts that actually matter on a 5-inch (motor pole counts, ESC firmware, prop balance, pack selection).
Skipping Build One to “save time” is a beginner pitfall. The time you save is paid back, with interest, on Build Two.
FPV versus fixed-configuration RTF drones
A ready-to-fly (RTF) drone is sold as a complete package intended to fly with minimal assembly. The DJI Mavic, DJI Mini, and DJI Avata are fixed-configuration consumer drones that fall into this category.16,17 You unbox them, charge them, register them where required, and they fly.
This book does not teach how to operate Mavic-style or Avata-style aircraft. For those, follow the manufacturer manuals and your local aviation rules. We use them here only as a contrast for what FPV is.
The tradeoff: what FPV gains, what it gives up
FPV gains performance, repairability, and modifiability.18 It gives up polish, GPS-assisted stability, long battery life, and one-button takeoff.16
A 5-inch freestyle quad will out-accelerate, out-roll, and out-flip a Mavic by a wide margin. It will fly closer to obstacles, faster between them, and through gaps the Mavic could not enter. It will also give you back almost no automation. There is no obstacle avoidance, no return-to-home unless you explicitly add a GPS module and configure the firmware for it, no auto-hover when you let go of the sticks, no automatic landing.19
A Mavic-class drone will hover where you put it, hold position in moderate wind via GPS lock, return home automatically when the battery gets low, and detect obstacles in multiple directions.16 The DJI Mini 4 Pro flies for up to 34 minutes per pack. The DJI Avata 2, which is the closest fixed-configuration analogue to a freestyle FPV quad, flies for about 23 minutes.17
FPV is repairable. When you break a prop, motor, or replaceable frame arm, you replace that component rather than the whole aircraft. The flight controller, ESCs, and video system are individual components on individual boards, swappable with a soldering iron. Exact repair cost depends on the selected build and current parts price; the dated BOM provides the planning figures. A Mavic that takes a bad fall usually depends on the manufacturer’s repair path rather than a bench-level component swap.
FPV is modifiable. You can change the firmware, retune the PIDs, swap the motors for different KV ratings, replace a 4S setup with 6S, change the video transmitter, change the camera, add or remove GPS, change the props from 5-inch to 5.1-inch. Every layer is open. A Mavic is a sealed appliance.
The tradeoff is real and goes both ways. FPV rewards manual skill and repairability but expects you to do configuration, maintenance, charging procedure, and risk management yourself. Camera drones reward casual operation and consistent capture but lock you into the manufacturer’s ecosystem and capabilities. Neither is universally better. They are different tools for different jobs.
A concrete contrast for the Mavic owner
If you have flown a Mavic and want to know what purpose-built FPV is better suited to: tight, manually flown proximity lines. A skilled FPV pilot, with permission, in a controlled legal location, with spotters where required, can fly a quad through a rolled-up garage door or through industrial gaps only a little wider than the aircraft. Some camera drones offer tracking, sport modes, or reduced obstacle sensing, but their airframes, control response, automation, and sensing behaviour are designed for a different capture job; disabling a safeguard does not turn one into a freestyle quad. Following moving vehicles adds substantial permission, route-control, traffic, and bystander risk and is not a beginner example.
This kind of flight requires skill, permission, location choice, and rule compliance. It is not what the book teaches you to do in your first year, and it is not a justification for ignoring rules. It is the kind of flight that exists, and that is the answer to “why bother building when I already have a Mavic.”
The short-pack reality
The cited beginner guide gives roughly 5–7 minutes for a typical 5-inch FPV pack.18 Hard freestyle can use that energy much faster, so treat the published range as planning context rather than a promise and time your own packs from takeoff to landing.
This catches every Mavic owner off-guard, so let’s normalise it. The DJI Mini 4 Pro flies up to 34 minutes per battery; the DJI Avata 2, which is closer in spirit to a freestyle FPV quad, flies up to about 23 minutes.16,17 A 5-inch freestyle quad on a 1300 mAh 6S pack, flown hard — punch-outs, dives, power loops — will land somewhere between 2 and 4 minutes.
That is not a defect. It is the price of high thrust. FPV packs are optimised for power delivery, not energy density. A quad that can pull more than its own weight in vertical thrust burns through a pack quickly. A whoop on a 1S pack flying gently might get 3-4 minutes; a 5-inch on a 6S pack flying aggressively might get closer to 2.
Worked example: plan, don’t be disappointed. Compare a one-hour camera-drone outing with a one-hour FPV outing.
- Mavic-class session. One pack, ~30 minutes of continuous flight. Plan one continuous mission: arrive, take off, fly the route, land, pack up.
- FPV session. Six 1300 mAh 6S packs, each giving roughly 3 minutes of hard flight. That is 6 × 3 ≈ 18 minutes of actual stick time, spread across an hour. The other ~42 minutes are landing, swapping packs, walking back to the bench, checking the aircraft, and prepping the next flight. Plan six discrete flights, not one mission.
The implication is not “FPV is bad,” it is “FPV is planned differently.” Pilots fly multiple packs per session. A typical field session involves 4–8 packs. The hour you spend at the field is mostly spent landing, swapping packs, walking back to the bench, and prepping the next flight. The three minutes between landings are the actual flight time.
The book covers pack selection, charging procedure, and pack rotation in the dedicated battery chapter. For now: when you see a 2-minute timer in someone’s freestyle edit, that is real. Plan around it.
Community and mentorship
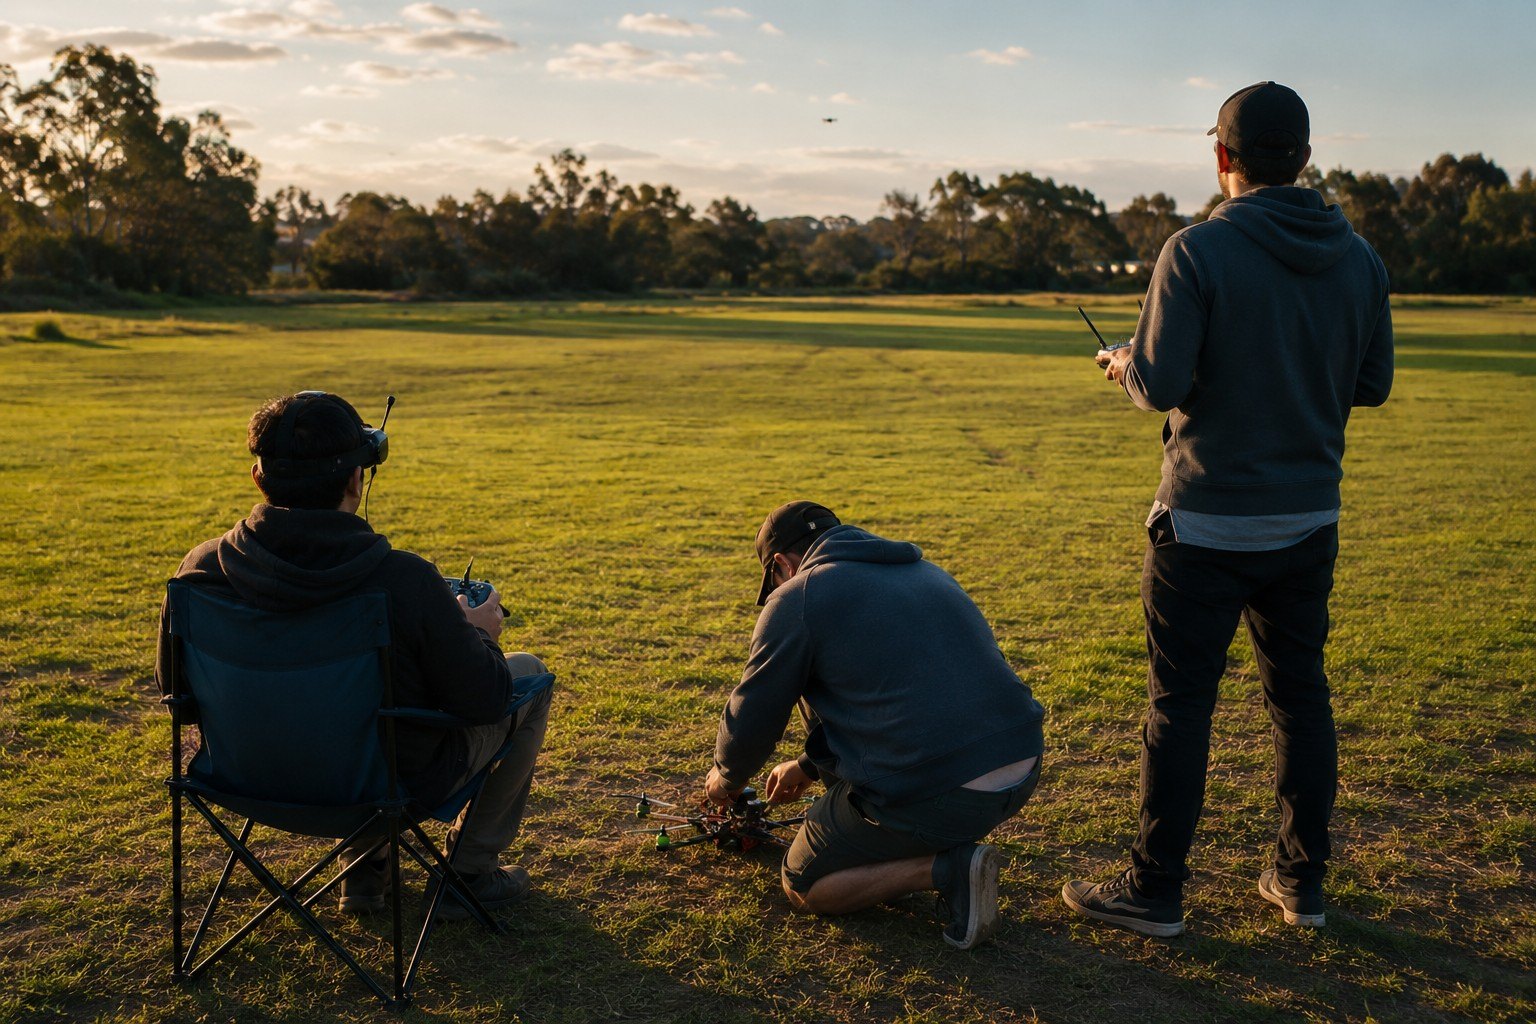 Photo 1.3. Local FPV meet — pilots at a field or mentor at a workbench
A buddy with a soldering iron beats a thousand tutorials. Said another way: tutorials, including this book, are necessary but not sufficient. A local pilot with two years of experience can, in fifteen minutes, spot the bad solder joint that you’ve been arguing with for three hours, the failsafe setting you skipped because you didn’t think it mattered, the ESC firmware that doesn’t match your motor poles, and the bind procedure you misread.
Local help lives in three places.
Local clubs and flying fields are the first stop. Many regions have an open flying field where FPV pilots gather on weekends. Some are formal clubs with insurance and AMA affiliation; some are informal groups that meet in a park. MultiGP chapters are the most organised end of this. MultiGP runs an international network of racing chapters, each tied to a flying location and a regular meeting cadence.13,14 Even if you do not want to race, attending a MultiGP chapter meeting is the fastest way to find experienced builders.
Online communities — FPV-specific Discord servers, manufacturer forums (RDQ Forums is widely cited), and large subreddits — are the second stop. They are excellent for asynchronous questions, build logs, and component-specific troubleshooting. They are not a substitute for someone who can physically look at your soldering work.
Recognised educators are the third stop. Joshua Bardwell’s site carries a complete beginner build tutorial,20 and his channel runs a lesson-by-lesson flying course that works through common beginner problems;21 sites like Oscar Liang’s host detailed written guides on hardware selection and category overviews.18 Use them as reference material; do not rely on them as a substitute for safe local mentorship.
Going alone is the most common beginner failure mode. The reader who finishes Build One and Build Two on time, with safe field habits, almost always knows at least one local pilot. The reader who quits after two months almost always tried to figure everything out from videos.
Find the chapter, the field, or the mentor before you spend a thousand dollars.
Cost reality across the book
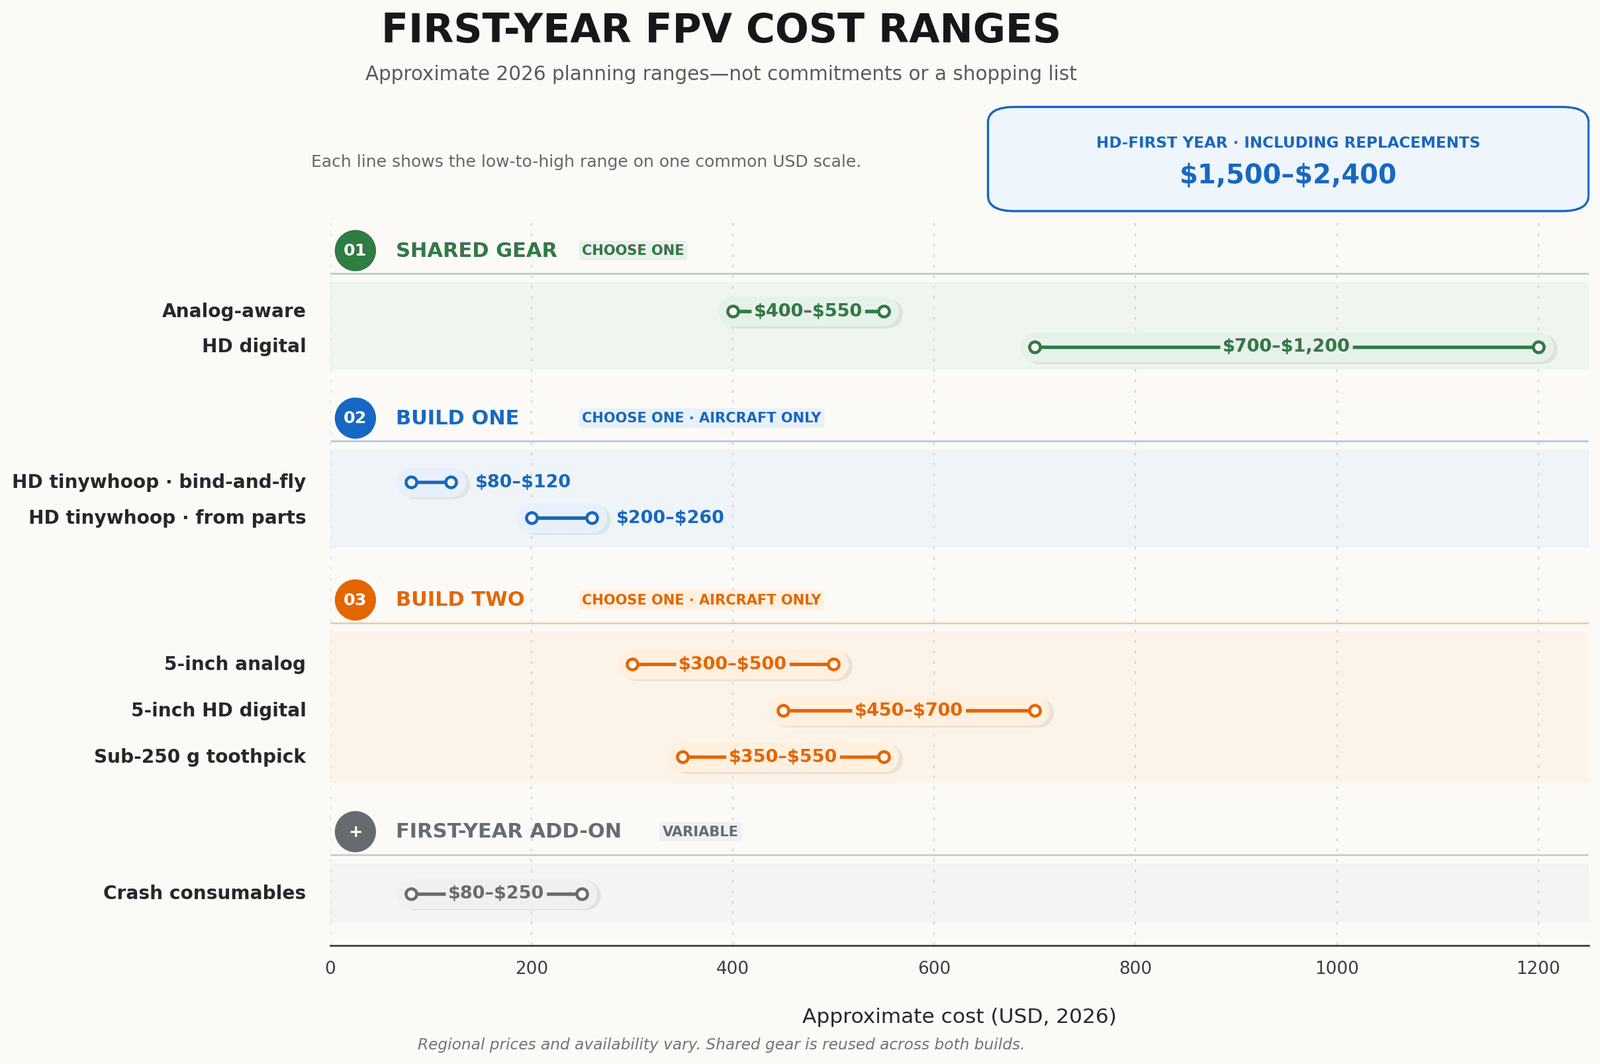 Figure 1.4. First-year cost ranges, as one choice per stage
The numbers above are 2026 ranges, not commitments. Treat them as planning input, not as a shopping list.
Read the figure as three staged choices plus one add-on, not as a column of costs to add together. You pick one shared-gear path, one Build One path, and one Build Two path. Only the crash consumables sit on top of everything you picked.
Stage one — shared gear. Choose one. One-time investment, reused across both builds.
- HD digital path: $700–$1,200 USD. Radio, HD goggles, charger, simulator.
- Analog-aware path: $400–$550 USD. Same radio, analog goggles, same charger, same simulator. Cheaper up front; moving to HD later can require another goggle and aircraft-video investment, so decide from the flying and image tradeoff rather than an assumed upgrade timeline.
Stage two — Build One. Choose one. Aircraft only; both options fly on the shared HD gear above.
- Analog tinywhoop, retail bind-and-fly: $80–$120 USD for an Air65-class kit that arrives assembled.
- HD tinywhoop, from parts: roughly $280–$340 delivered for the current chapter 6 carts, depending on the matched video system. Same aircraft class, bought as components.
Stage three — Build Two. Choose one. Aircraft only.
- 5-inch HD digital: $450–$700 USD.
- 5-inch analog: $300–$500 USD. Cheaper, but only worth it if your shared gear is also analog.
- Sub-250 g toothpick: $350–$550 USD.
Add-on — crash consumables, first year: $80–$250 USD. Props, frame arms, motors, occasional cameras. Highly variable; depends on how often and how aggressively you fly.
Worked example, HD-first reader doing the from-parts whoop BOM in chapter 6: $700 + $280 + $450 = $1,430 on the low end and $1,200 + $340 + $700 = $2,240 on the high end, before crash consumables. Add the chart’s $80–$250 planning allowance for replacements over the first year: roughly $1,510–$2,490, rounded to a $1,500–$2,500 planning band. These are dated ranges, not a checkout promise; use the BOM page for the current row-by-row subtotal.
An analog-path reader pairing compatible analog shared gear, the bind-and-fly whoop, and the analog Build Two example starts around $400 + $80 + $300 = $780 before replacements. That lower first-year estimate is real. If the reader later chooses HD, the second ecosystem’s goggles and aircraft-video hardware are a new budget decision rather than an inevitable or scheduled upgrade.
The retailer worksheet is the active part of this section. Open a spreadsheet. List the four shared-gear items: radio, goggles, charger, simulator. For each, find three retailers in your region. Mark each item as in stock, backordered (more than two weeks), or NLA risk (no longer available, end-of-life, or rumoured discontinued). Add a column for price. The total of the in-stock items is your real shared-gear budget; the NLA column is your warning that you need a backup choice.
Do this before ordering. The single largest 2026-era beginner expense is buying gear that turns out to be backordered for two months, then panic-ordering substitutes that don’t match the rest of the ecosystem.
The 15-chapter, four-part path
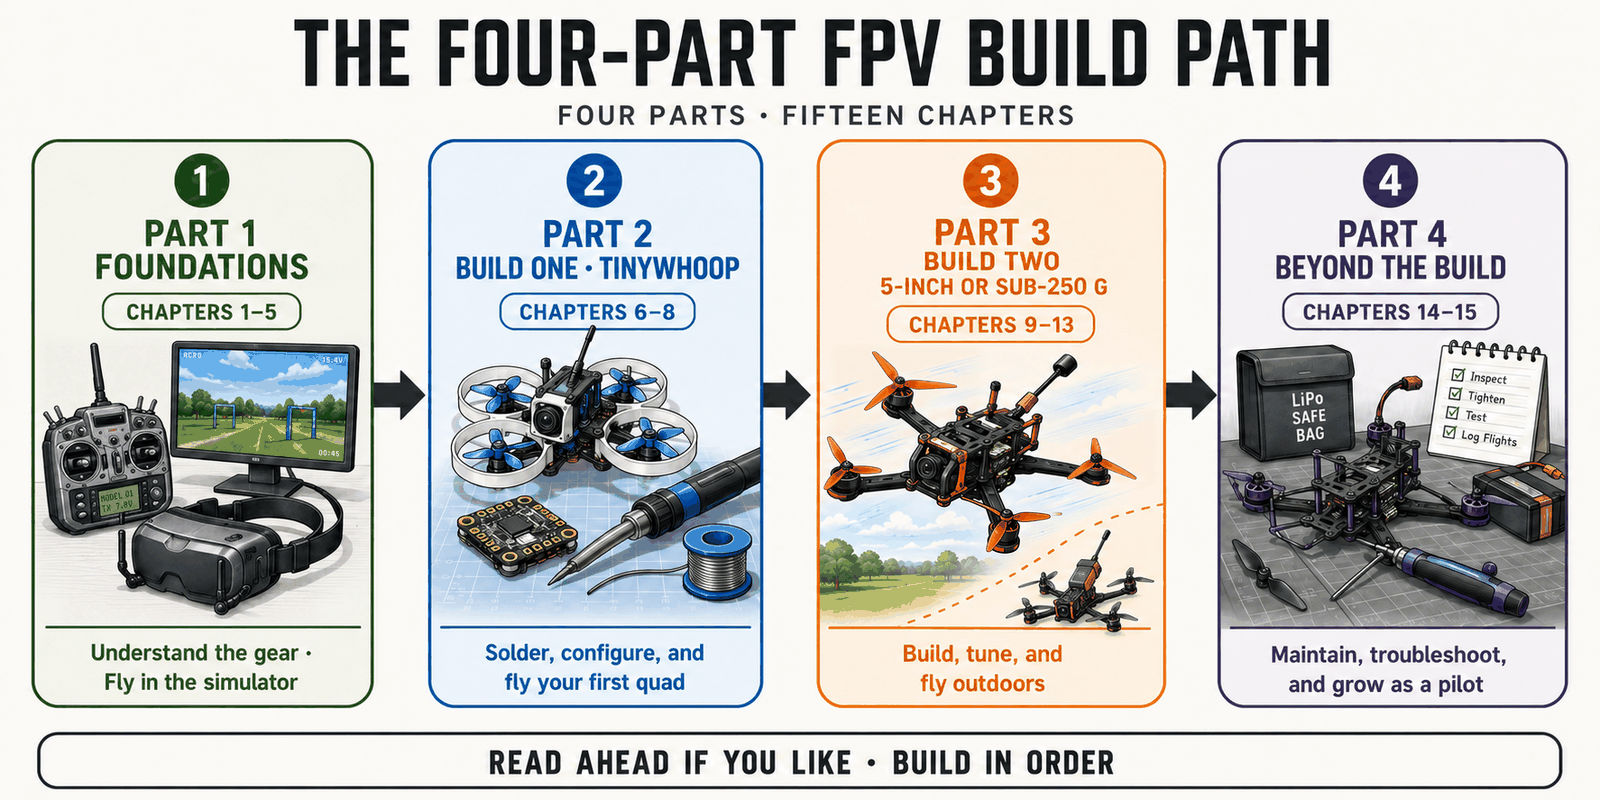 Figure 1.5. The 15-chapter path
Four parts, fifteen chapters.
Part 1 — Foundations (chapters 1–5) is where you finish what this chapter started. You will understand the ecosystem in detail, pick a control-link family (ELRS), pick a video-system family (HD digital or analog), choose your first radio and goggles, and set up a simulator. By the end of Part 1, you can fly competently in a sim, you have shared gear sitting on your bench, and you have a parts list for Build One. You have not yet soldered anything.
Part 2 — Build One: Tinywhoop (chapters 6–8) is your first build. You learn to solder on small pads, you assemble a whoop frame, you flash and configure Betaflight on the flight controller, you bind the receiver to your radio over ELRS, you set up failsafe, and you do a props-off bench test. By the end of Part 2, you have flown your own quad indoors. You can diagnose a failed bind, a wrong motor direction, and a bad solder joint.
Part 3 — Build Two: 5-inch freestyle or sub-250 g (chapters 9–13) is your second build. You apply the same pipeline to a larger aircraft. You learn 6S vs 4S tradeoffs, motor pole count, ESC firmware (AM32 and Bluejay), prop balancing, and basic PID concepts. You take the quad to a field. By the end of Part 3, you have flown a 5-inch (or sub-250 g toothpick) outdoors, tuned its PIDs and filters from a known-good preset, and captured a usable edit. Systematic crash repair and the maintenance discipline that turns a damaged quad back into a flying one are Part 4.
Part 4 — Beyond the Build (chapters 14–15) is maintenance, troubleshooting, and your first year as a pilot. Crash repair without rebuilding from scratch. Pack rotation and storage. Field etiquette. Rule basics for your region. When and how to upgrade. By the end of Part 4, you are a year-one pilot with two working aircraft, a working bench, and a working set of habits.
The progression is intentional. Each part assumes the previous one. You can skip ahead to read, but you cannot skip ahead to build. Build Two assumes Build One’s lessons.
End-of-chapter buyer hero spread
Three aircraft, side by side, as a buyer-facing reference:
The Mavic you have. A DJI Mini 4 Pro is representative. AUW around 249 g. Up to 34 minutes per pack. GPS hold, obstacle sensing, automated capture, polished image.16 Use it for: travel video, family photos, real-estate B-roll, anything where you want an easy-to-fly, polished result. Not taught in this book.
The whoop in chapter 7. A 65–80 mm tinywhoop matched to your video system. The current one-pack listed-parts ledgers are about 29 g for analog, 44 g for HDZero, 49 g for Walksnail, and 47 g for DJI before measured corrections. No GPS, no obstacle avoidance, manual control, ducted props. Runtime depends on the finished AUW, exact pack, tune, and flying style, so chapter 8 has you measure it instead of promising a number from a different aircraft. Use it for: indoor practice, quiet outdoor flying in calm wind, learning the build pipeline. Built in chapters 6–8.
The freestyle quad in chapter 10. A 5-inch HD freestyle build is representative. The current planning ledger is about 626 g with the specified 1400 mAh pack and no action camera, or about 790 g with the specified HERO and mount; the finished scale reading controls. The cited beginner guide gives roughly 5–7 minutes for a typical 5-inch pack;18 aggressive flying can shorten that, so measure the finished build rather than promising a fixed duration. No GPS unless added, no obstacle avoidance, manual control, open props. Use it for: park freestyle, proximity lines, the kind of flight that fills YouTube edits. Built across chapters 9–13. The 186 g/235 g 4-inch toothpick variants are the parallel option for readers who need the lower weight class.
This is the spread to keep on your wall while you plan. The Mavic is what you already do. The whoop is what you build first. The freestyle quad is what you build second. The book covers the second and third columns.
Do not buy parts yet
If you take one thing from this chapter, take this: do not order parts before you finish the budget worksheet, the local-community lookup, and the video classification exercise. Buying parts before understanding the category map is one of the most expensive beginner mistakes in FPV.18 Beginners who make this mistake often find themselves selling unsuitable gear at a loss not long after, because it doesn’t fit the flying path they actually wanted to take.
Finish Part 1. Then order.
Summary
FPV feels different because the pilot sees from the aircraft, not from outside it. The five-piece starter ecosystem is radio, quad, goggles, charger, and simulator (four of which you buy once and reuse across builds). Quads are category-specific tools: tinywhoops for indoor practice, cinewhoops for proximity cinema, 3-inch and toothpick for park-scale outdoor agility, 5-inch freestyle for park flight, 5-inch race for racing, 7-inch long-range for cruising, and X-class and cinelifters for professional work outside the beginner path. FPV differs sharply from camera drones: it gains performance, repairability, and modifiability, and gives up polish, GPS hold, long flight time, and one-button takeoff. Hard FPV flights last 2-4 minutes, not 25-30. Community matters more than tutorials. The book follows a four-part path: foundations, tinywhoop, 5-inch or sub-250 g, then your first year. Plan first, order second.
Before you order
Five things to do before chapter 2. Do them in this order.
Watch three edits. Pull up one freestyle edit, one cinematic or real-estate edit, and one MultiGP race edit. (“FPV freestyle 5 inch”, “cinewhoop real estate”, “MultiGP race POV” all work as searches.) Place each one on the eight-category map. Notice that the same physics produces wildly different flying because the pilot wanted a different thing.
Price the shared gear. Open three retailers you actually use. Build a quick spreadsheet for radio, goggles, charger, and simulator. Mark each item in stock, backordered, or NLA risk. The total is your one-time investment: what you pay across both builds. If the number busts your budget, the rest of the book waits while you adjust the plan.
Find your nearest field. MultiGP’s chapter finder, your local FPV club page, an FPV Discord, RDQ Forums, or any open flying field listing. Pick a Saturday and go watch a session before you spend a dollar on parts. The half-hour conversation you’ll have with a local pilot will compress two months of YouTube learning.
Sketch the four budget totals. Shared gear, HD tinywhoop path, 5-inch HD path, and sub-250 g path. Use the price ranges from this chapter and your retailer notes. Choose your Build Two path on purpose, not because you happened to see a freestyle edit yesterday.
Plan your first hour at the field. A Mavic owner thinks “one battery, 30 minutes.” An FPV pilot thinks “five packs, ~15 minutes of stick time, lots of pack-swap downtime.” For your eventual 5-inch outing, plan for 1300 mAh 6S packs at roughly 3 minutes each. Bring more packs than you think you’ll fly. The shape of an FPV session is short bursts, not one long flight.
Calibration check. If you can tell a non-FPV friend in 30 seconds what FPV is, why it’s different from a Mavic, what you’re about to build, and roughly what it’ll cost, you’ve got the orientation. Otherwise, re-read the relevant section before chapter 2.
References
- DJI Goggles 3 Specs, 2024. DJI Goggles 3 specifications, dji.com. https://www.dji.com/goggles-3/specs
- RadioMaster Boxer product page. radiomasterrc.com. https://radiomasterrc.com/products/boxer-radio-controller-m2
- RadioMaster Pocket product page. radiomasterrc.com. https://radiomasterrc.com/products/pocket-radio-controller-m2
- ExpressLRS Getting Started. expresslrs.org. https://www.expresslrs.org/quick-start/getting-started/
- Walksnail Avatar HD Goggles X product page. caddxfpv.com. https://www.caddxfpv.com/products/walksnail-avatar-hd-goggles-x
- ISDT 608AC product page. isdtshop.com. https://isdtshop.com/products/isdt-608ac
- SkyRC B6neo Smart Charger product page. skyrc.com. https://www.skyrc.com/b6neo-series
- ExpressLRS Hardware Selection. expresslrs.org. https://www.expresslrs.org/hardware/hardware-selection/
- DJI O4 Air Unit Specs, 2025. DJI O4 Air Unit Series specifications, dji.com. https://www.dji.com/o4-air-unit/specs
- BetaFPV Air65 product page. betafpv.com. https://betafpv.com/products/air65-brushless-whoop-quadcopter
- EU Regulation 2019/947. Commission Implementing Regulation (EU) 2019/947, EUR-Lex. https://eur-lex.europa.eu/eli/reg_impl/2019/947/oj
- EASA Privately Built Drones FAQ. EASA, I build my own drones (privately built). https://www.easa.europa.eu/en/faq/116513
- MultiGP Chapters. https://www.multigp.com/chapters/.
- MultiGP Events. https://www.multigp.com/events/.
- FAA Remote Identification of Drones. faa.gov. https://www.faa.gov/uas/getting_started/remote_id
- DJI Mini 4 Pro Specs, 2023. DJI Mini 4 Pro specifications, dji.com. https://www.dji.com/mini-4-pro/specs
- DJI Avata 2 Specs, 2024. DJI Avata 2 specifications, dji.com. https://www.dji.com/avata-2/specs
- Oscar Liang FPV beginner guide. oscarliang.com. https://oscarliang.com/fpv-drone-guide/
- Betaflight Documentation. betaflight.com. https://betaflight.com/docs/wiki
- FPV Know-It-All — Joshua Bardwell. fpvknowitall.com. https://www.fpvknowitall.com/
- Joshua Bardwell — Learn to Fly an FPV Drone. “Learn to fly an FPV drone (for total beginners)”, YouTube playlist. https://www.youtube.com/playlist?list=PLwoDb7WF6c8lCKhQOTy-Vb9LfW0VAIrTP
- Liftoff product site. liftoff-game.com. https://www.liftoff-game.com/
- VelociDrone product site. velocidrone.com. https://www.velocidrone.com/
- FAA Recreational Flyers and Community-Based Organizations. faa.gov. https://www.faa.gov/uas/recreational_flyers
- BetaFPV Air75 product page. betafpv.com. https://betafpv.com/products/air75-brushless-whoop-quadcopter